Upgrades complete! Time to upgrade!
So, previously I acquired a pair of billet 72mm turbos to replace the cast 67mm ones that died.
Teardown of the 67's
The Teardown:
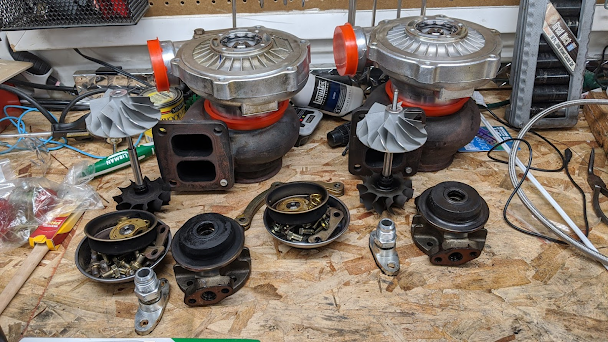
Teardown of the 67mm turbos showed that the passenger's side turbo was oil starved. Upon closer inspection, I realized that the oil feed adaptors I was using were actually oil restrictors. On top of that, the passenger's side one was clogged with only about 25-30% of the oil flow able to get through. I believe the source of that clog was from when my Fram oil filter came apart and sent parts of the paper element throughout the entire motor. So I am actually pretty impressed that the turbo lasted as long as it did.

Most of the damage was to the bushings within the turbos, which ended up depositing most of the material onto the turbine shaft.

The Rebuild:
I wanted to save these turbos, as we are building a turbo LM7 to put into dad's 67 cutlass. So first was to see if we could get the turbine shaft back into spec. First step was to mic out the clean part of the shaft (and compare it to the other turbo) so we know what the specs are, and then to begin the cleanup. So we chalked it up in the drill press, and started lightly sanding it. We started out with 320 grit and worked our way up to 2000. We continued measuring it throughout to ensure we weren't going past spec, and ended up getting it identical to the rest of the shaft (within the error margin of my micrometer).

So then we completely disassembled the rest of the turbo and got it into the parts washer, got it cleaned up, and Luca got it reassembled.

The next issue was that the downpipes were not directly compatible. I had to swap from a 3.25" V-band to a 3", as well as extend the downpipe about 2".


Once I got it all back together and fired it up, I finally had a sigh of relief as there was no more squeaking. Got it fixed.

When we built these turbo manifolds, we figured we might run into issues with thermal expansion. 8 years ago I guessed that the manifold was most susceptible to cracking on the shortest runner, right where it meets the collector. I was correct. So I got out my welders and sealed up the crack. I drove it to a cars & coffee two weekends in a row, and on the way home from the second I could hear the ticking come back. It cracked right before the repair welds. I welded it up again. Drove it another 2 weeks, and it cracked right before that weld. So now, if I weld it up again... it would be solid weld from the flange to the collector.

I also decided to upgrade a few other things as well. I ordered new 50mm wastegates and a 50mm blow off valve.

I got the blow off valve installed pretty easily (they were directly interchangeable).
So then we completely disassembled the rest of the turbo and got it into the parts washer, got it cleaned up, and Luca got it reassembled.
Back to the Billet 72's
The 72's were a bit different from the 67's. The compressor housing was actually quite a bit larger, but ended up discharging at the same location. We almost ran into an issue with the driver's side compressor housing hitting the water neck, but when bolted down, there is a few thousandths clearance.
Once all the modifications were made, I installed the new titanium weave turbo blankets to help keep the under-hood temps down. I was finally ready to take an "After" photo.
Fix one thing, another thing breaks...
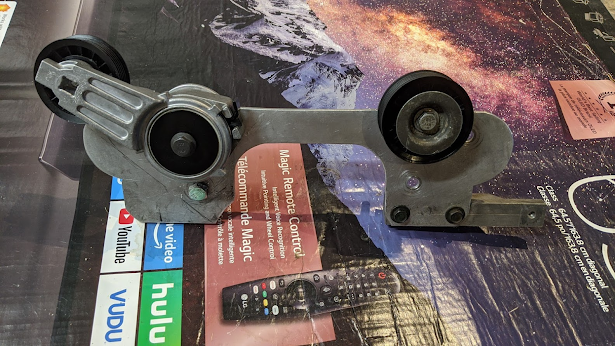
After the first drive, I started hearing quite a lot of squeaking from under the hood. After a few days I finally tracked it down to the two upper idler pulleys. So I ordered a new set, and replaced them. All good...
... or so I though. They kept squeaking. Could not get them to stop. I believe the fact that we didn't have a proper tensioner was finally coming back to bite me. So I took a trip over to AutoZone and asked if I could go play around with all their tensioners so I could find something that would work. I ended up finding one. No clue what it is for, it is an AC Delco part so it is for a GM... but other than that I just have the part number. I got home, took off the serpentine system, and got to work.
Once I got it all back together and fired it up, I finally had a sigh of relief as there was no more squeaking. Got it fixed.
Fix two things, another thing breaks...
After a few drives, I started hearing the signature ticking sound of an exhaust leak. It took me quite a while to find it, but when I did... well... shit...
When we built these turbo manifolds, we figured we might run into issues with thermal expansion. 8 years ago I guessed that the manifold was most susceptible to cracking on the shortest runner, right where it meets the collector. I was correct. So I got out my welders and sealed up the crack. I drove it to a cars & coffee two weekends in a row, and on the way home from the second I could hear the ticking come back. It cracked right before the repair welds. I welded it up again. Drove it another 2 weeks, and it cracked right before that weld. So now, if I weld it up again... it would be solid weld from the flange to the collector.
Time to upgrade!
To properly fix this, I needed new manifolds. I ordered a bunch of 304 stainless schedule 10s cast 2" elbows, and started planning.
I also decided to upgrade a few other things as well. I ordered new 50mm wastegates and a 50mm blow off valve.

So now I need to begin the teardown. I need to pull the turbos and manifolds back off again, and start building the new manifolds.
I'm upgrading. Time to upgrade!
I also managed to score a new gauge cluster in pretty good condition out of a 74 hatchback. My current one, isn't in the best condition....


I spent about an hour going over the entire new cluster with Maguire's headlight polish, which took care of all of the surface oxidation (as well as the small surface scratch on the lense). I then went over all the raised edges with some silver paint the wife had in her art kit. I then shoved it into the car. It turned out pretty good.


So until next time...


Comments
Post a Comment